Adding Cards to Digital Wallets
Google Wallet
These instructions can also be found on Google’s support page.
1. Open the Google Wallet app.
2. At the bottom, tap Add to Wallet .
5. At the bottom, tap Save.
6. Read the Issuer Terms and tap Accept.
7. If you’re asked to verify your payment method, choose text message as the option so you receive a text message from Wise with the code. Enter the code in the Google Wallet app to complete verification.
Apple Pay
These instructions can also be found on Apple’s support page.
1. In the Wallet app, tap the Add button
2. Tap Debit or Credit Card
3. Tap Continue
5. If you’re asked to verify your payment method, choose text message as the option so you receive a text message from Wise with the code. Enter the code in the Google Wallet app to complete verification.
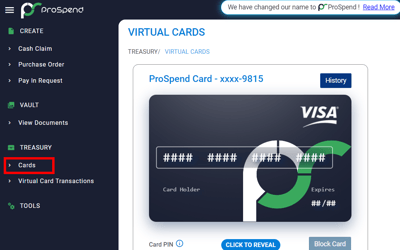
2. Once on the Cards page, the card holder can see all their cards.
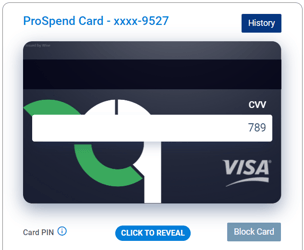
4. Below the card, the user is able to click “Click to Reveal” to see the Card PIN, which can be used to authorise those transactions where a PIN is requested
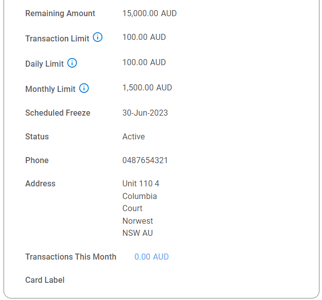
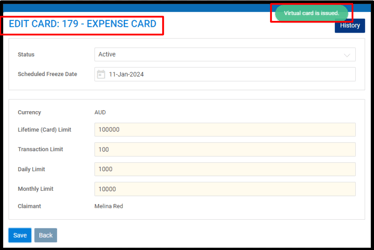
7. The next field is Scheduled Freeze. This is the date on which the card will automatically be frozen, and be unable to be used until it is reactivated by an Admin user.
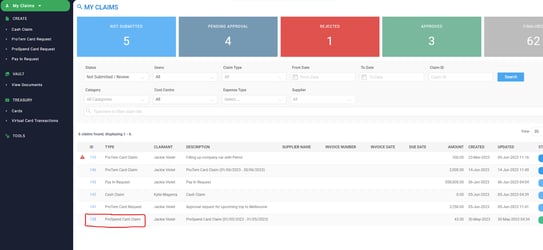
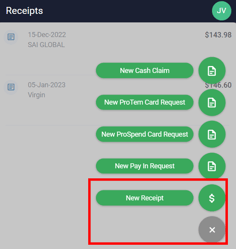
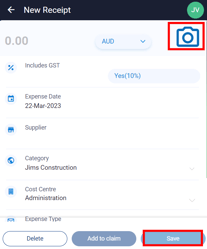
Once the receipt is in their vault, the user can then use the ‘Smart Match’ feature on the desktop version of the ProSpend Card Claim to trigger the claim to find all matching receipts for each transaction in the claim.

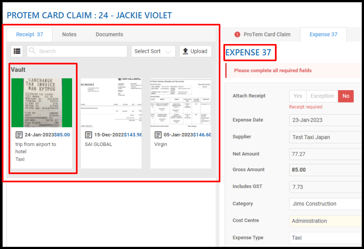
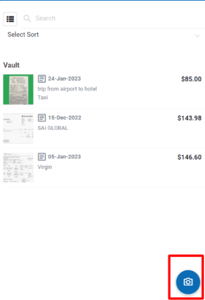
Alternatively, after transacting, the user can simply open the ProSpend Card Claim on their mobile app, tap the new transaction from the list of transactions, tap the camera icon at the bottom right and then take a picture of the receipt they want to link with that transaction.
Submitting the ProSpend Card Claim Forward
Linking a Wise Business Profile to ProSpend
ProSpend can integrate with your Wise Business Profile(s) to enable you with functionality like issuing company cards, holding balances and making invoice payments directly from within ProSpend.
To do so, you need to connect an existing Wise Business Profile, or set up and connect a new one, by following the below steps whilst being logged in as an Admin:
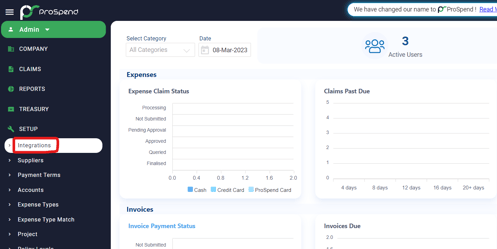
1. Under SETUP, click Integration
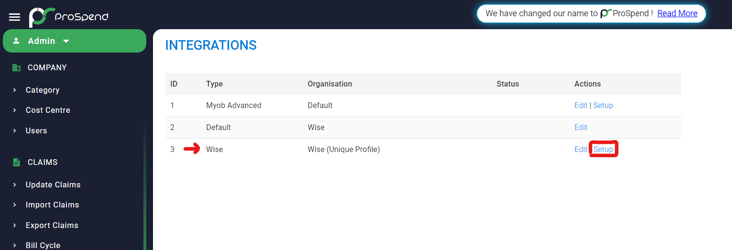
2. On the integrations page, find row where Type = Wise, and click “Setup” under the actions column
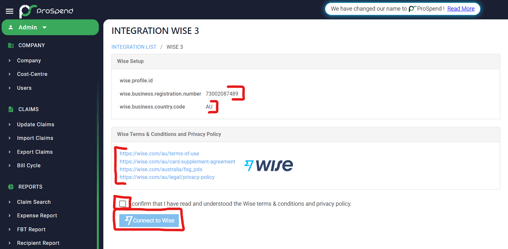
3. On the Wise integration page
- Confirm that the business registration number shown is the right number for your business
- Confirm that the Country Code shown corresponds to where your business is registered
- Click through and read the links in the Wise Terms & Conditions and Privacy Policy box, followed by checking the box underneath to signal your agreement to Terms and Conditions
- Click Connect to Wise to trigger the Wise onboarding process
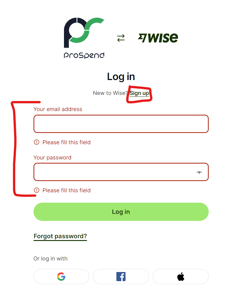
4. If you already have a Wise Business account, please sign in to it here and follow the prompts to authorise ProSpend to integrate with your Wise Business Account
If you would like to setup a new Wise Business Account, click sign up and follow the prompts that will guide you through the process of creating the new account
5. Once you have gone through the process of creating your Wise Business Account, you will find your Profile ID populated in the Wise Integrations Setup page.
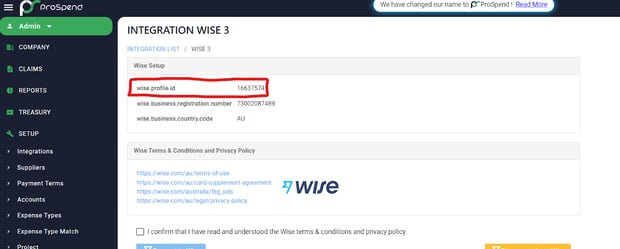
6. From here, please look out for email communication from Wise, who will be in touch with you in relation to the KYB process involved in verifying your business, and ultimately will email you once your verification is complete.
7. Once this verification is done, we will continue with the quick, last couple of setup steps on our end, which require a verified profile, and once those are done we will get in touch with you to schedule and conduct your training.
Guide to Getting Verified
- The legal structure of your business; and
- The industry your business operates in
Sole Traders
- ABN document
- Business Licence (if licence is required for business to operate)
- Authorisation Letter from a Sole Trader (only if the profile holder is not the Sole Trader of the company)
- Company website and/or business description that clearly explains the business (depends on customer’s input during the initial onboarding process with Wise)
- ABN document
- Full name, date of birth and country of residence of each partner
- Business Licence (if licence is required for business to operate)
- Authorisation Letter from a partner of the Partnership (only if the profile holder is not a Partner of the company)
- Company website and/or business description that clearly explains the business (depends on customer’s input during the initial onboarding process with Wise)
- ABN document
- Full name, date of birth and country of residence of each director and shareholder who owns 25% or more shares in all the companies involved in the partnership
- For Charities / NPOs that are registered with ACNC, the date of birth and country of residence of the Chairperson, Secretary and Treasurer or their equivalents
- For Charities / NPOs that are not registered with ACNC, the full name, date of birth and country of residence of all members who control the organisation (board members, directors, trustees etc).
- Business Licence (if licence is required for business to operate)
- Authorisation Letter from a partner of the Partnership (only if the profile holder is not a Partner of the company)
- Company website and/or business description that clearly explains the business (depends on customer’s input during the initial onboarding process with Wise)
- ABN document
- Full name, date of birth and country of residence of each beneficial owner/trustee (shareholder of corporate trustee) of the trusts in the partnership
- For all the trusts in the partnership, either the following must be provided:
- A copy of the trust deed or extract that shows the following:
- Full name of trust
- Country and date of establishment of trust
- Full name of the settlor, beneficiaries, beneficial owner (appointor), trustees
- Signed and dated signature page of the trust deed
- Copy of Australian Taxation Office (ATO) Statement issued within the last 12 months
- A copy of the trust deed or extract that shows the following:
- Business Licence (if licence is required for business to operate)
- Authorisation Letter from a partner of the Partnership (only if the profile holder is not a Partner of the company)
- Company website and/or business description that clearly explains the business (depends on customer’s input during the initial onboarding process with Wise)
- Full name, date of birth and country of residence of each shareholder who owns 25% or more shares in the company
- Full name, date of birth and country of residence of each director of the company
- ABN document
- ASIC document
- Business Licence (if licence is required for business to operate)
- Authorisation Letter from a Director (only if the profile holder is not one of the directors or owner of the company)
- Company website and/or business description that clearly explains the business (depends on customer’s input during the initial onboarding process with Wise)
- Full name, date of birth and country of residence of each shareholder who owns 25% or more shares in the company
- Full name, date of birth and country of residence of each director of the company
- ABN document
- ASIC document
- Business Licence (if licence is required for business to operate)
- Authorisation Letter from the Chairman, Secretary or Treasurer (only if the profile holder is not one of the directors or owner of the company)
- Company website and/or business description that clearly explains the business (depends on customer’s input during the initial onboarding process with Wise)
Adding Funds to your ProSpend Balance
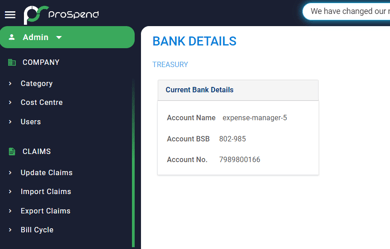
As part of signing up, you will be set up with a ProSpend Balance under your business and this balance will have its own unique bank account details (Account Name, BSB, Account Number).
These bank details are made available via the balances screen and users can simply transfer the funds through. Alternatively, you may choose to use our PayIn Requests, which digitise and streamline any request/approval processes businesses would like to put in place around the transferring of funds from their bank accounts to their ProSpend Balances. Both methods are detailed below.
Adding funds without the PayIn Request
6. From here, please look out for email communication from Wise, who will be in touch with you in relation to the KYB process involved in verifying your business, and ultimately will email you once your verification is complete.
7. Once this verification is done, we will continue with the quick, last couple of setup steps on our end, which require a verified profile, and once those are done we will get in touch with you to schedule and conduct your training.
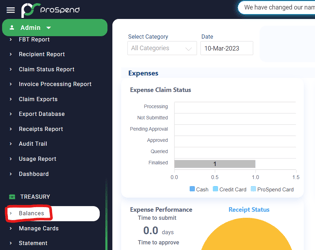
2. Then click ‘Bank Details’ under the balance to which you’d like to add funds (please note that having multiple balances is not available in the first release of the Company Cards Solution
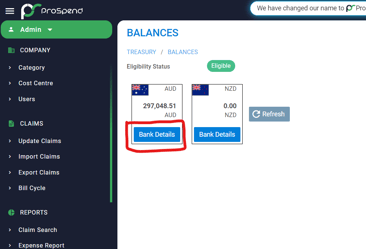
3. Add the bank account details shown here on your banking app as a recipient and transfer funds to them to add funds to your ProSpend Balance.
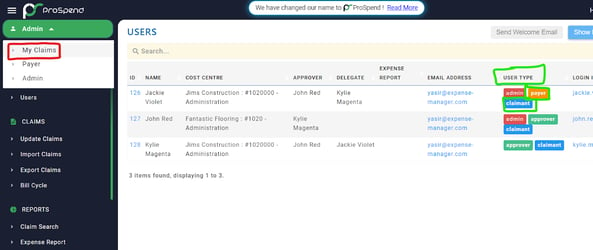
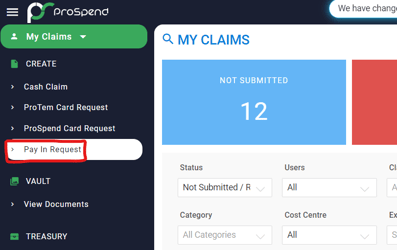
2. On the My Claims page, from under CREATE in the Navigation Bar, select Pay In Request to create a new PayIn Request
3. Enter a Description of your choice and click ‘Save’
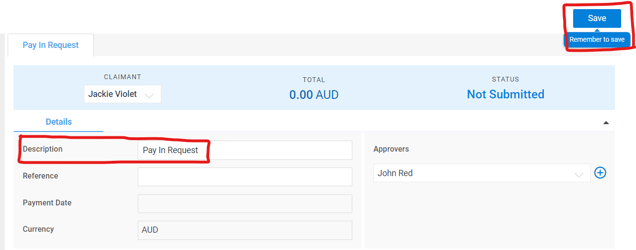
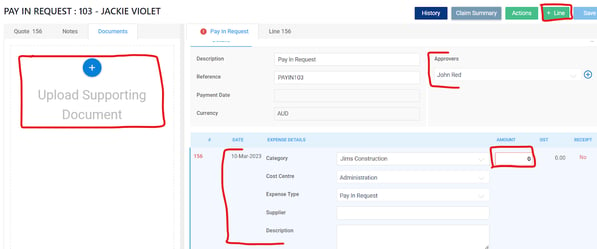
5. When ready for this to go through the approval flow, hit Save and then Submit under the Actions button on the top right

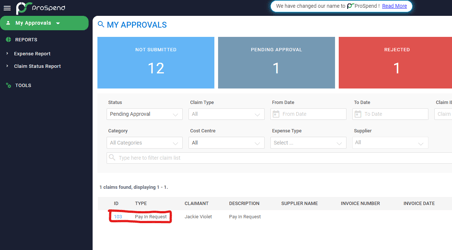
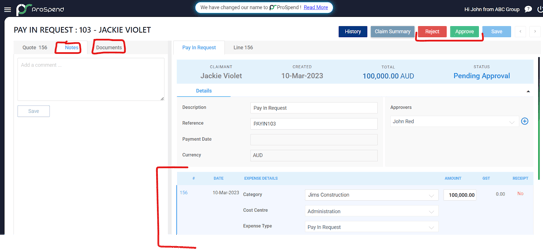
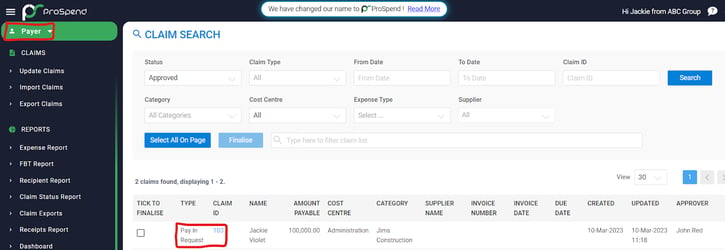
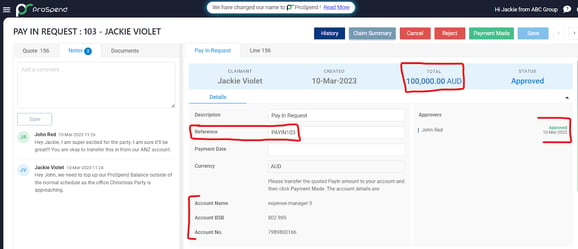
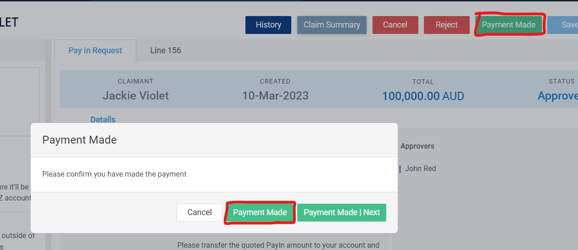
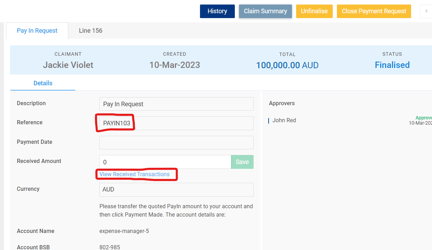
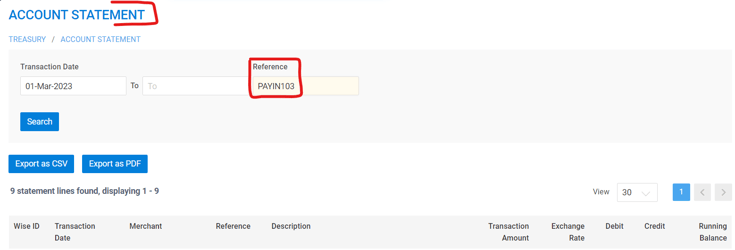
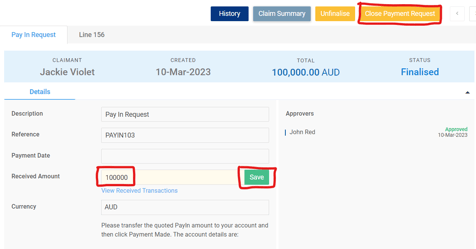
12. Once confirmed that the funds have been received, back on the Pay In Request, the Payer should enter the amount received in the received box, hit Save and then close the Payment Request
Issuing a ProSpend Card Without Requests
The Admin User is the only User Type that can issue cards directly, without needing an approval flow. The only card type that can be issued this way is the ProSpend Card.
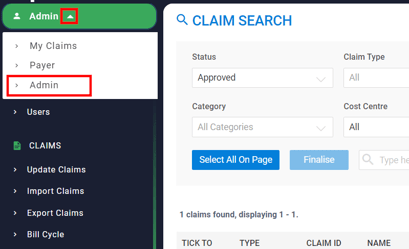
1.To be able to do this, the Admin user must be logged in as an Admin.
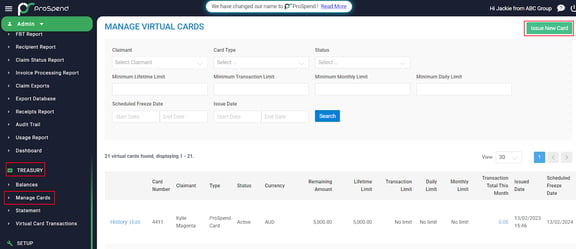
2.The ‘Issue New Card’ button sits on the ‘Manage Cards’ screen, accessible under ‘Treasury’ on the Navigation Bar on the left.
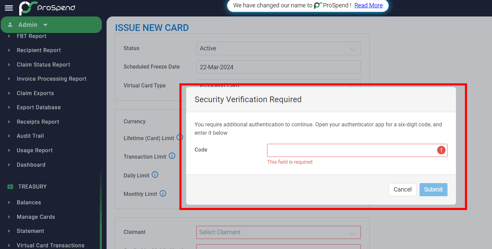
4. Once Authenticated, the Admin user will be able to set the card’s
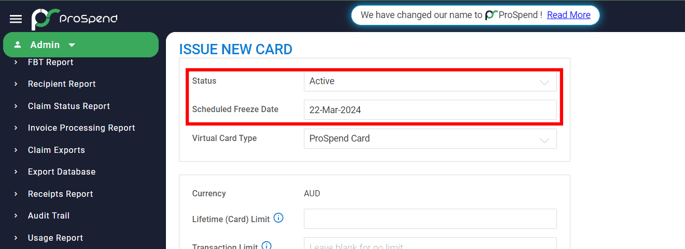
a. Status
i. Active Status means the card will be available to be used
ii. Frozen Status means the card will be issued but won’t be able to be used until it is edited to Status = Active
b. Scheduled Freeze Date
i. The date this card will automatically be frozen, rendering it unable to transact until it is reactivated - this field automates to 1 year out but can be edited
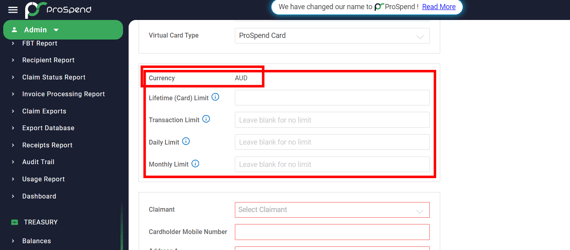
c. Limits
i. Please note the currency at the top as the system will read and apply the limit numbers in this currency
ii. Lifetime Limit
1) Mandatory. Lifetime limit is the total amount that this card can spend across it's lifetime. Every card must have a lifetime limit and if this is left blank, it is assumed to be $0, which means that the total amount that can be spent using this card is $0.
iii. Transaction Limit
1) Optional. Transaction limit is maximum amount that can be spent using this card in a single transaction. Leaving this blank means that this card is unbounded in terms of what it can spend per transaction, but the other limits, if set, will still apply.
iv. Daily Limit
1) Optional. Daily limit is the maximum amount that can be spent in a single day. Leaving this blank means the card is unbounded in terms of what it can spend in a day, but the other limits, if set, will still apply.
v. Monthly Limit
1) Optional. Monthly limit is the maximum amount that can be spent with this card in a specific calendar month. Leaving this blank means that this card is unbounded in terms of what it can spend in a calendar month, but the other limits, if set, will still apply.
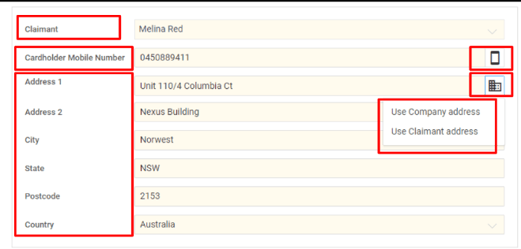
d. Cardholder / Claimant
i. Please note that only Users with the Claimant user type can be issued with cards, and will show up here
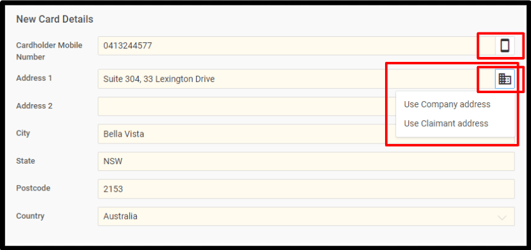
e. Billing Address Details
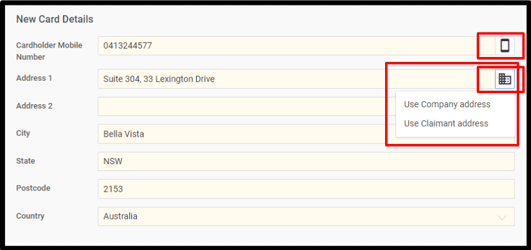
i. Please note that the Billing Address entered here is the address that will be required to be input at the time of transaction, when such information is required by the Merchant to process the transaction.
ii. The company and Claimant’s address can be pulled in to here by clicking the building Icon in the box
f. Cardholder Mobile Number
i. Please note that the Cardholder Mobile Number field must be the cardholder’s mobile which could, from time to time, be sent transaction verification text messages
ii. The Mobile Phone from the Claimant’s ProSpend field can be pulled in by clicking the phone icon in the box. If the mobile number on the user's ProSpend profile is not filled, the field will remain blank despite clicking the icon. The mobile number could also be manually entered
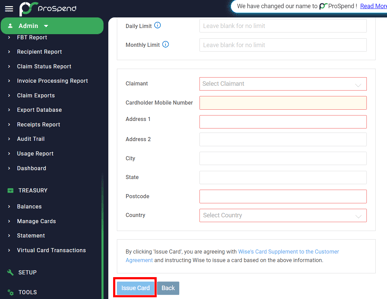
5. Once the right inputs have been entered in the fields on the ‘Issue New Card’ screen, the user can press the ‘Issue Card’ button a the bottom of the screen to issue the card
ProSpend Card Requests
Requesting a new ProSpend Card as a Claimant
1. Claimants logged in as the Claimant user type can raise a ProSpend Card Request from the left Navigation Bar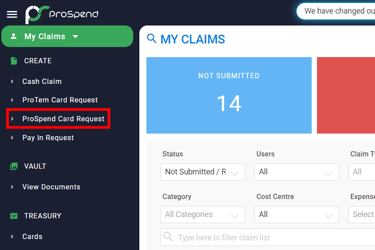
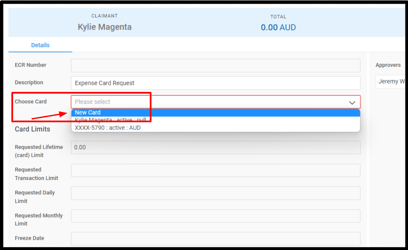
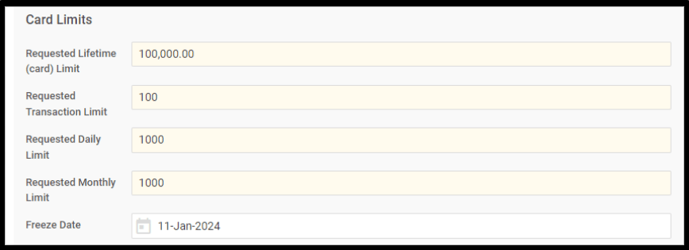
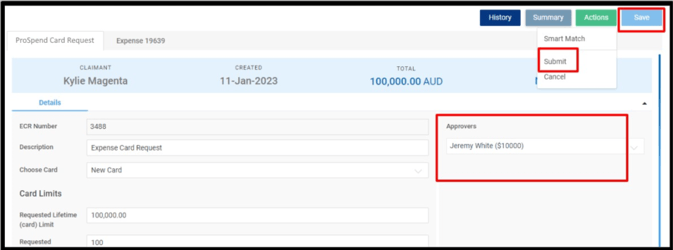
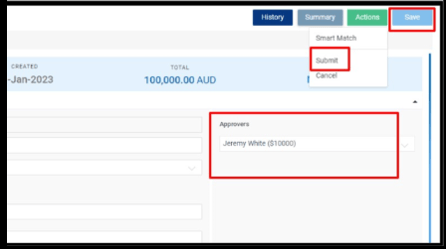
5. Once happy to submit this forward, ensure that the right approver is selected
a. The approval flows available for this process are similar to other approval flows available in ProSpend

Finalising a ProSpend Card Request and Issuing a Card as a Payer

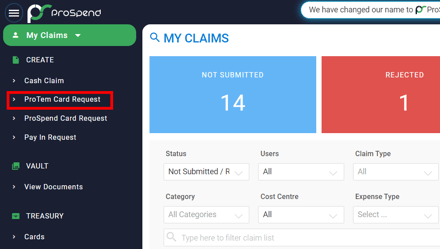
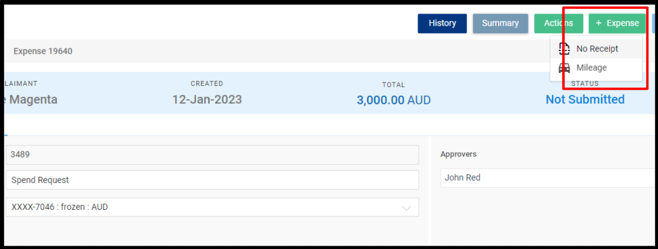
2. Once in the ProTem Card Request, in the Choose Card field, the Claimant can choose:

3. Regardless of the selection in step 2 above, the next step is to populate the requested limits for this card
c. Buffer
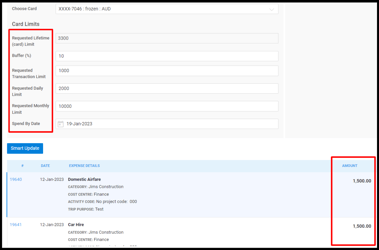
4. If the Claimant selected New Card in option 2, the next step is to fill in the Billing Address Details that are to be associated with this card. If an existing card was chosen, the Billing Address Details used when the card was issued will be used - these can be seen by the Claimant in their Cards List Screen.
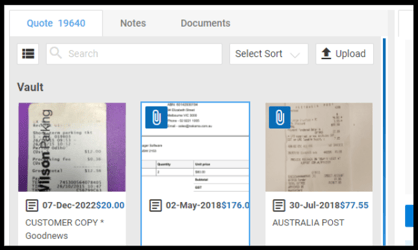
5. The claimant also has the option to attach any supporting documents, such as quotes or screenshots of an online store, as well as Notes to support their request for a ProTem Card. This can be done on the left side of the screen
6. Next, click save at the top right corner and finally, click Submit to trigger the approval process
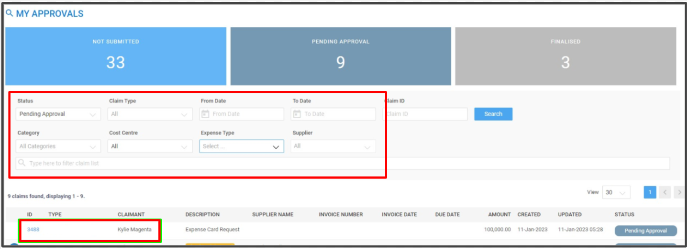
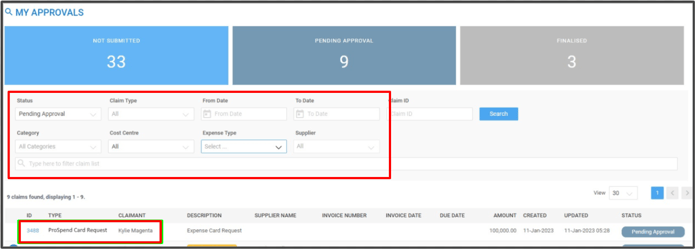
2. Once on to the ProTem Card Request as an approver, then easily Edit, Reject or Approve the claim from the top right, just like any other claim

Finalising a ProTem Card Request and Issuing a Card as a Payer
1. Once a ProTem Card Request has been approved, Payers can find the request in their Claim Search page and Edit, Reject or Finalise
2. Based on system configurations, payers can be allowed or restricted from editing Limits before finalising the claim
3. Once Finalised, the ‘Issue Card’ button will show up on the top right. Where this ProTem Card Request is not issuing a new card but reactivating a frozen card, the button showing up will be ‘Re-activate Card’

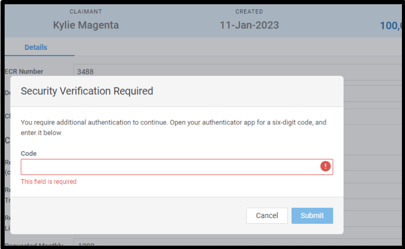
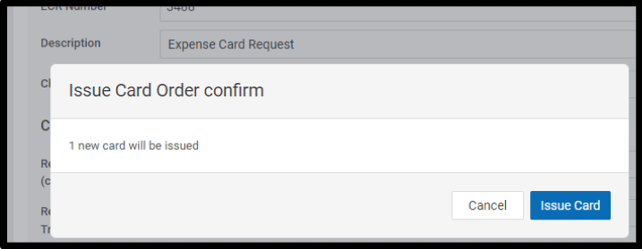
4.Clicking this will prompt the Payer to authenticate via 2FA, after which they can confirm they would like to issue this card
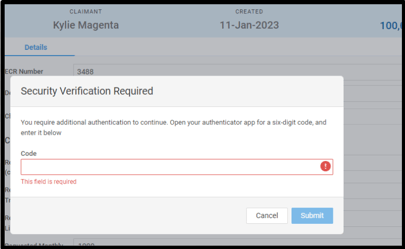
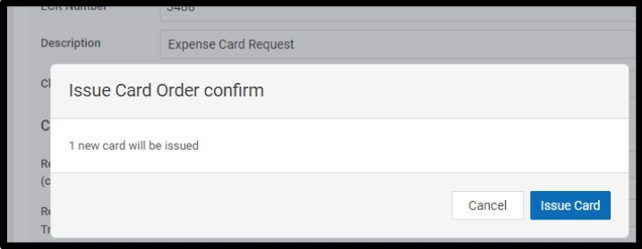
5. ProTem Card Requests can be finalised and cards can be issued in bulk from the Claim Search screen. The same prompts as step 4 above will appear when actioning in bulk.
ProTem Card Claims
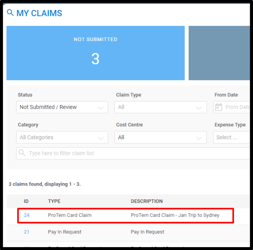
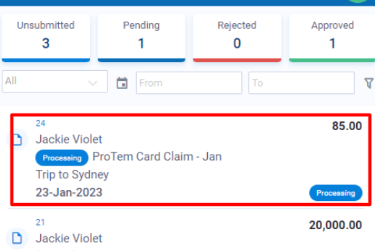
Accessing the ProTem Card Claim
Desktop:
Mobile:
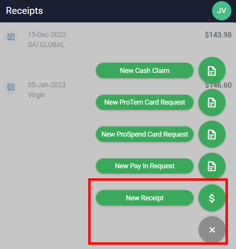
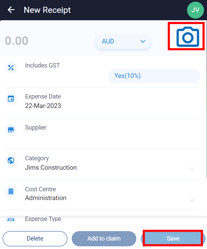

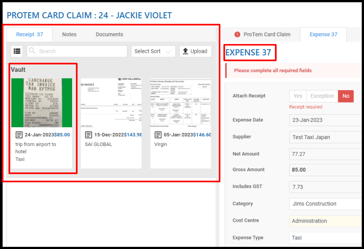
The user can also manually match each transaction on the ProTem Card Claim with the right receipt, after the receipt has been added to their vault. This is doable both via the desktop and the mobile versions of the ProTem Card Claim.
Desktop:
Mobile:
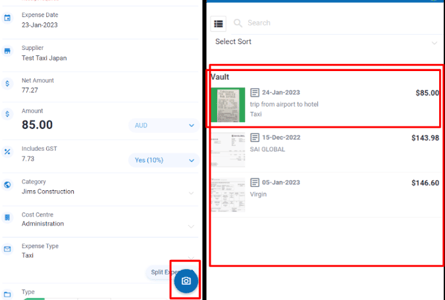
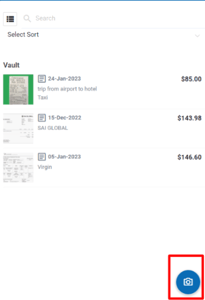
Alternatively, after transacting, the user can simply open the ProTem Card Claim on their mobile app, tap the new transaction, tap the camera icon at the bottom right and then take a picture of the receipt.
Linking and Closing the ProTem Card Claim with the ProTem Card Request
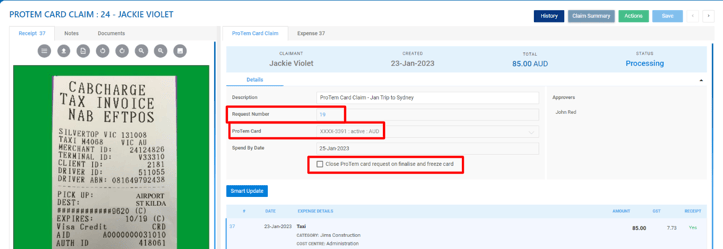
When all expected transactions are done and the receipts for each of those has been added to the claim, the ProTem Card Claim can be submitted forward through an approval flow. If the “Close ProTem Card Request on Finalise and Freeze Card” checkbox is ticked, when this Card Claim is finalised after being fully approved, the linked ProTem Card Request is automatically closed and the actual ProTem Card linked to the Card Claim and the Request is Frozen and made available for selection under a new ProTem Card Request.
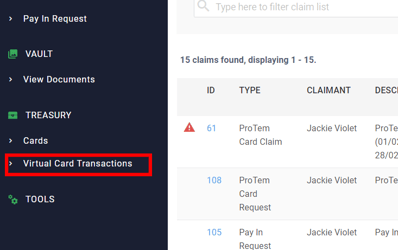
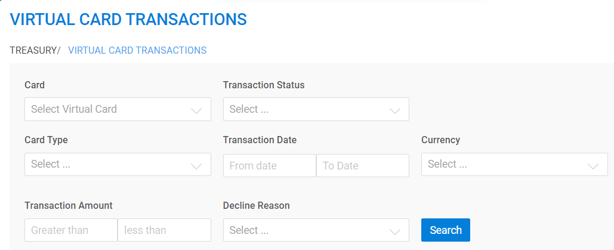
Users are also able to export the list of transactions they are seeing by clicking Export as CSV.

To see additional information for each transaction, users are able to click More Columns.

Depending on the User Type and Permissions of the user viewing the transactions, the system may restrict the transactions being shown. When viewing transactions as a Claimant, only this particular claimant’s transactions will be shown. When viewing as a Payer, only those transactions where the Payer has permissions to view transactions will be shown. When viewing as an Admin, all transactions will be shown.
Disputing Transactions
The process starts with the cardholder, who is typically set up as a claimant in ProSpend.
1. After transacting, the cardholder will find that transaction in their ProSpend/ProTem Card Claims.

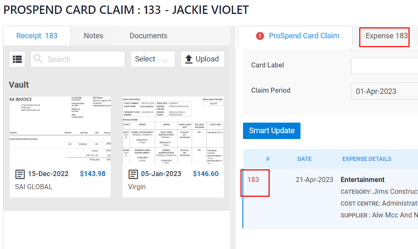
2. On the ProSpend/ProTem Card claim, the user can then click through into an individual transaction to see the below screen.
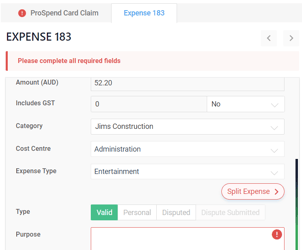
3. Once on the individual transaction screen, the cardholder is able to select disputed, to mark the transaction as one they’d like a Payer to dispute and provide further information around the nature of the dispute via the claim’s notes section or via the description box of the individual expense.
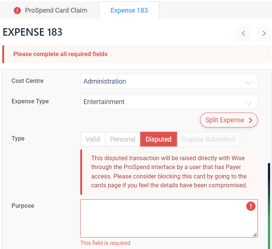
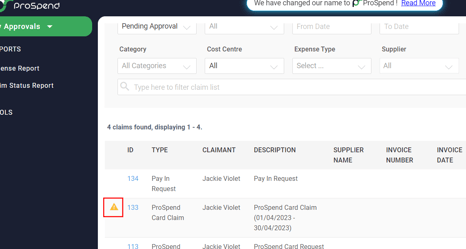
4. Once this claim has been submitted forward with transaction(s) disputed, all subsequent viewers of this claim will be able to see this flag on their claims screen.
5. Once the claim has gone through the approval process, Payers will be able access the specific disputed transaction within the claim, make a call as to whether this transaction really is a disputable one and if they conclude that it is a disuptable one, then click “Create Dispute” button.
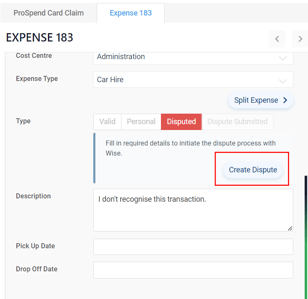
6. Clicking the “Create Dispute” button will initiate the guided Wise dispute flow within ProSpend’s UI.

7. The Payer, based on their discussion with the cardholder and the information they have on hand, will then first have to select a reason for the dispute.
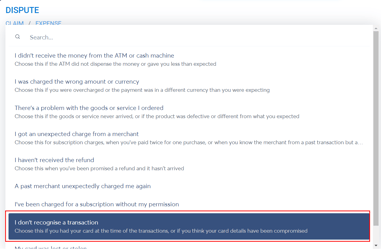
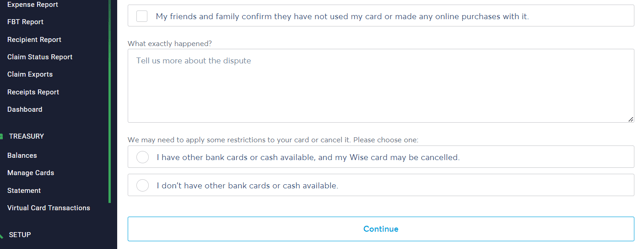
8. Once they’ve selected a reason, the Payer will be presented with additional questions based on the reason they selected. After providing the required information, the Payer is then able to lodge this dispute by clicking Continue.
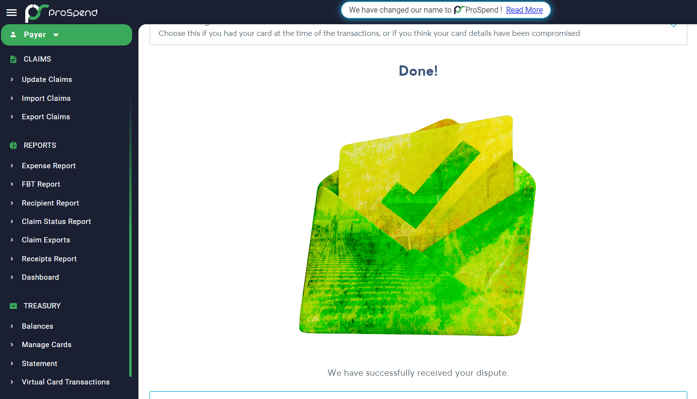
9. Once the dispute has been submitted, Wise will contact the cardholder to gather more information and achieve a result for the dispute. If successful, the funds can be clawed-back by Wise from the Merchant and their acquirer and credited back towards the ProSpend customer’s balance.
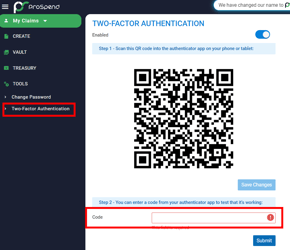
2. First download a trustable authenticator app. Please check with your business’s IT team to see if they have a preferred option.
3. Once in your authenticator app, select the option to add by scanning a QR code. Then scan the QR code shown on the Two Factor Authentication page on ProSpend.
a. Follow the prompts to finish setup in your authenticator app.
4. Enter the code shown in the authenticator app in the Code field on ProSpend’s Two-Factor Authentication page to test that it is working.
5. You will be prompted to enter a code from this authenticator app when taking sensitive actions in ProSpend, such as issuing a card or accessing a card’s sensitive information.
a. When this happens, kindly access the code from your mobile phone
Generating a Wise Statement
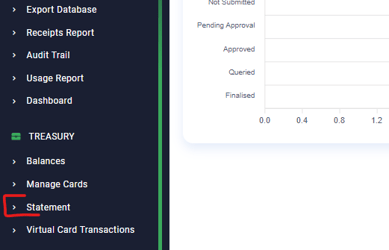
2. On the statement page, set an appropriate to and from dates at the top and hit search to see all credit and debit transactions that happened with your balance during that period
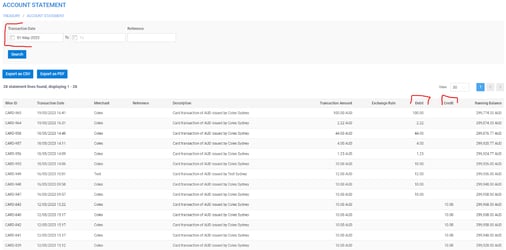
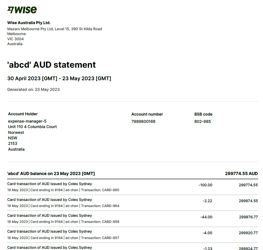
3. By clicking on the Export CSV, the system will download a zip file containing the CSV file with all the transactions as per the date filters at the top of the screen.
Cards Related Permisions
Issue/Activate a card requested from a ProTem Card Request
- This permission applies to Payers only
- ProTem Card Requests are submitted by claimants as a way to seek approval for a particular transaction, or set of transactions. Once approved and finalised, a card can be issued from this request, to facilitate the transactions requested by the claimant.
- Payers with this permission enabled are able to issue and reactivate cards directly from Approved and Finalised ProTem Card Requests
Issue/Activate a card requested from a ProSpend Card Request
- This permission applies to Payers only
- ProSpend Card Requests are submitted by claimants as a way to request a new ongoing ProSpend card, as well as request edits to existing ProSpend Cards. An example of an edit is when a card holder requests an increase in their monthly limit.
- Payers with this permission enabled are able to issue and reactivate cards directly from Approved and Finalised ProSpend Card Requests
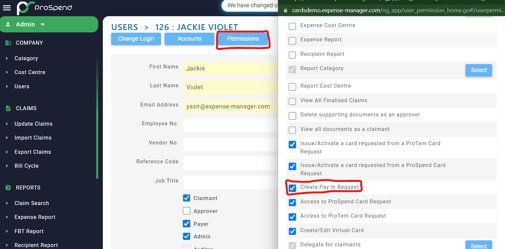
Create Pay In Request
- This permission applies to Payers only, and Payers can create PayIn requests only when logged in from the Claimant view
- Pay In Requests are designed to digitally facilitate the approvals required by finance team members to move funds from the businesses bank account to their ProSpend Balance.
- Users with Payer access and this permission enabled, can switch to the claimant user type to then create a PayIn request and submit it through the approval flow.
Access to ProSpend Card Request
- This permission applies to Claimants only
- With this permission enabled, the particular claimants have access to creating ProSpend Card Requests from the navigation bar on the left
Access to ProTem Card Request
- With this permission enabled, the particular claimants have access to creating ProTem Card Requests from the navigation bar on the left
Create/Edit Virtual Card
- This permission applies to Admins only
- With this permission enabled, Admins can Issue and edit ProSpend cards directly from the Manage Cards screen, without having to have a ProSpend Card Request raised and approved
Cards Admin
- This permission can only be applied by super users
- This permission can only be applied to Admin users
- This permission can only be removed by Super Users
- If an admin user has this permission
- They can give other admins the permission to direct issue cards
- They can remove this permission too
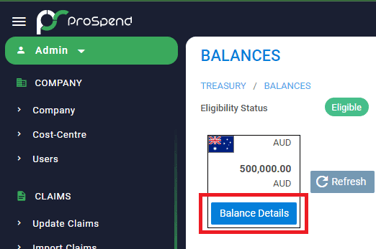
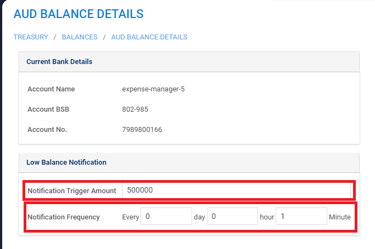
- Enter a Notification Trigger Amount. When the balance goes below this amount, the system will generate the notification
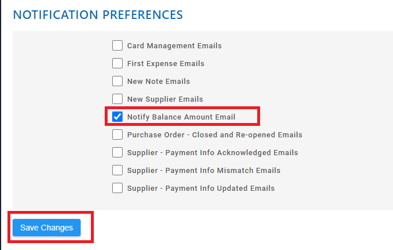
- Enter a Notification Frequency to determine the frequency with which they are notified about the balance being below the trigger amount. The notifications stop once the balance amount is over the trigger amount
Frequently Asked Questions
Q. Can a card be locked / blocked?
A. All cards issued out of ProSpend can be blocked by the Card Holder or an Admin user, directly from within the ProSpend application.
Q. What type of transactions can cards issued out of ProSpend be used for?
A. Both our cards, ProTem and ProSpend, can be used for:
- Online transactions
- In-Store Transactions
- ATMs
Q. Can a Virtual Card issued out of ProSpend be used to withdraw cash from ATMs?
A. In Australia, some ATMs now facilitate Contactless Withdrawals - Instead of having to insert their physical card into the ATM, card holders can simply tap at ATMs enabled with this functionality to initiate the withdrawal. This is similar to tapping to make a payment on an actual terminal at a physical store.
Q. What is a ProTem Card and ProTem Card Request?
A. The ProTem Card is a Temporary virtual card issued to an employee as a result of them submitting a ProTem Card Request. Employees make ProTem Card Requests when they are seeking to get spend pre-approved, and needing a company issued card to conduct the spend.
- An employee doesn’t have an ongoing ProSpend Card as they don’t normally need to spend company funds.
- For their adhoc spend, the employee can make a ProTem Card Request, which will result in a ProTem Card being made available to them strictly for the amount and duration required for this particular approved spend
- An employee normally has the ongoing ProSpend Card, which covers their Petrol, lunch and basic tools expenses as they regularly travel to customers sites to fulfil their jobs. For one particular job though, the employee knows they will need a certain advanced tool from Bunnings that costs most than their ProSpend Card limits allow them to spend.
- The employee will be able to put through a ProTem Card Request to be issued a ProTem Card that they can use for this one-off transaction falling outside the limits of their ProSpend card
Q. How does the ProTem Card, ProTem Card Request and ProTem Card Claim process work?
A. By way of example:
- An employee doesn’t have an ongoing ProSpend Card as they don’t normally need to spend company funds.
- The Holiday’s are around the corner and this employee has been tasked with organising the Office Holiday Party and gifts.
- After having done some research, the employee creates a ProTem Card Request, attaches their documents and findings, fills in the requested Card Limits and Spend-By Date and submits the Request through for approval.
- Based on the cost-centre, amount and some predefined logic, the system automatically routes this request through the appropriate approvers.
- Once approved, the employee is Issued a Card with the requested limits, available only until the Spend By Date on the Request. The employee is notified by the system that they have been issued their requested ProTem Card.
- The employee logs in to the system, accesses the card, adds it to their Apple Pay account on their mobile device and conducts the transactions they had requested the card for. For each transaction, the employee simply uses the ProSpend Mobile App to take a picture of the receipt, adding it to their Documents Vault.
- Each of these transactions instantly shows up in the system under their ProTem Card Claim, and automatically finds and pulls the matching receipt from the employee’s Documents Vault.
- On the Spend By date, after a very successful Holiday Party, the card automatically freezes and the employee is notified.
- The employee simply accesses the ProTem Card Claim, adds the necessary level of coding as made required by their system administrator and submits the request through the approval process through which their spending and coding can be reviewed.
- This ProTem Card Claim is then finalised by members of the finance team, which automatically closes the initial ProTem Card Reqeust, and exported out via API to the ERP being used by the business.
- The ProTem Card issued and used in this process remains frozen and available to this employee to select when requesting approval for their next spend.
Q. What are ProSpend Cards?
A. ProSpend cards are ongoing debit cards. They are designed for employees that regularly spend company funds in the course of their duties. These cards, like all other cards issued out of ProSpend, withdraw from a central balance. These cards can replace reimbursements and even company credit cards.
Q. Are Cards issued out of ProSpend secured with 3DS?
A. Yes, for merchants requiring 3DS verification for online transactions, the system will generate a OTP (One Time Password) and send it to the mobile number registered with the card. Once this OTP has been entered online, the transaction will go through as normal.
Q. How can a Cards issued out of ProSpend be added to my mobile wallet?
A. Cards issued out of ProSpend will show up for Claimants in their Cards screen, accessible under Treasury in the left Navigation Bar on the Desktop version of ProSpend.
Q. Are the Cards issued out of ProSpend issued by a bank?
A. ProSpend has partnered with Wise (formerly known as Transferwise), who are issuing all cards and storing all funds being managed through the ProSpend interfaces. In effect, when someone signs up to our Cards and Payments modules, they are agreeing to Wise terms and conditions and creating a Wise account. They are then able to manage this Wise account out of their ProSpend account, as well as benefit from all of the features added by ProSpend - such as our ERP integrations, Claims and Approval Flows.
Q. Can ProTem and ProSpend card requests be turned off for certain claimants?
A. Yes, by using Claimant Permissions, accessible under their User page, Admins can remove the permissions for these Claimants to create ProSpend and ProTem card requests.
Q. Where do my funds sit in the ProSpend ecosystem?
A. ProSpend has partnered with Wise (formerly known as Transferwise), who are issuing all cards and storing all funds being managed through the ProSpend interfaces. In effect, when someone signs up to our Cards and Payments modules, they are agreeing to Wise terms and conditions and creating a Wise account. As part of this Wise/ProSpend account, businesses are able to hold funds that they can then use to pay their supplier invoices and/or back their card transactions. These funds are held securely with Wise in dedicated bank accounts and highly quality liquid assets, and the funds are never loaned out. Wise safeguard your money, which means they keep all of your money in accounts that are completely separate from the ones they use to run Wise and that your money is backed by assets that Wise hold in separate accounts. For more information, please click here.
Q. Do funds have to be loaded/unloaded individually to and from each card?
A. No, the cards issued out of ProSpend are Zero-Balance cards. These cards are all linked to a central balance from which they withdraw funds for each transaction in real time. How much these cards can and cannot withdraw is governed by each card’s limits. It is just this central balance where funds need to be loaded.
Q. Are these cards Credit or Debit cards?
A. Cards issued out of ProSpend are Debit cards - they need funds to be loaded to a central balance that all cards can be linked with and from which they withdraw funds in real time when transacting. How much these cards can and cannot withdraw is governed by individual card limits.
Q. How do the card limits work?
A. Each card issued out of ProSpend can have multiple limits that dictate how much a particular card can withdraw from the central balance. The limits available are:
- Lifetime Limit
- Mandatory. Lifetime limit is the total amount that this card can spend across it's lifetime. Every card must have a lifetime limit and if this is left blank, it is assumed to be $0, which means that the total amount that can be spent using this card is $0.
- Monthly Limit
- Optional. Monthly limit is the maximum amount that can be spent with this card in a specific calendar month. Leaving this blank means that this card is unbounded in terms of what it can spend in a calendar month, but the other limits, if set, will still apply.
- Daily Limit
- Optional. Daily limit is the maximum amount that can be spent in a single day. Leaving this blank means the card is unbounded in terms of what it can spend in a day, but the other limits, if set, will still apply.
- Transaction Limit
- Optional. Transaction limit is maximum amount that can be spent using this card in a single transaction. Leaving this blank means that this card is unbounded in terms of what it can spend per transaction, but the other limits, if set, will still apply.
- Spend by Date / Scheduled Freeze Date
- Mandatory. The date on which the card will automatically be frozen
Q. Is there a limit which can restrict which industries a particular card can be used to transact with?
A. This is not currently available but we are working on this feature. It will utilise Merchant Category Codes (akin to Industries) and our clients will be able to define which MCCs each card can and cannot transact with.
Q. Are receipts made mandatory for transactions made with cards issued out of ProSpend?
A. Transactions done on cards issued out of ProSpend work the same as our other card claims. The transactions show up under the appropriate Card Claim automatically, and then auto-match with receipts that users have added to their documents vault simply by taking a picture of the receipt with their ProSpend mobile app. The card claim can be set to require receipts for each transaction, and can facilitate ‘exceptions’ that require approval where a receipt has been lost or cannot be provided otherwise.
Q. Is each cardholder required to have a Wise profile?
A. Each card holder is not required to have a Wise profile as the Wise account is set up with one Personal Profile and a Business Profile linked to that Wise Personal Profile. This Business Profile is then linked to the desired ProSpend account. Once linked, cards can be issued to any Claimant set up in ProSpend, without them having to be set up with a Wise profile.
Q. How are funds loaded into the ProSpend/Wise Account and how long do the funds take to show up.
A. The steps to adding funds are as follows:
- A user with the right permissions and access creates a PayIn request for the amount they want added to the balance.
- This PayIn request is then forwarded through a predefined, dynamic approval flow.
- Once approved, a Payer with the right permissions is able to see the approved PayIn Request, which will also show the bank account details to which they’ll have to transfer the funds, as well as the reference code they need to enter when making the payment.
- Then the payer can separately launch their banking app and transfer the approved amount to the bank details shown whilst entering the reference code, and mark the approved PayIn Request as ‘Payment Made’.
- Having done this, users will now see a link to the statement page and once they click this, they’ll be guided to the statement page, which will have been pre-filtered by the PayIn Request’s unique Reference code, making it easier to find the incoming transaction.
- Back on the PayIn Request, the user will be able to enter a ‘Received’ amount to confirm the amount received, and click ‘Close Payment Request’.
- These funds will now be available for cards to withdraw from, in real time, government by each individual card’s Card Limits.
Q. Can cards issued out of ProSpend be physical cards?
A. Cards issued out of ProSpend are only digital/virtual. In the future, we will roll out the ability to issue Physical cards.
Q. What currencies can I transact in?
A. Cards issued out of ProSpend can be used to transact in most currencies, even if the central balance funding the card is not in the currency required to fulfil a transaction. This transaction will cause a conversion from the Source Currency (currency in which the balance is held) to the Target Currency (currency required to fulfil the transaction), and this conversion will happen at the Spot Rate available from Wise at the time of the transaction. Overall, the cost of the transaction will be much much lower in comparison to the same transaction being done with a bank issued card.
Q. Is there any interest earned on the balance being held in the ProSpend ecosystem?
A. The funds being held with ProSpend/Wise are not considered a deposit by APRA and are not reinvested to generate interest. Instead, Wise safeguards these funds by holding 105% cash at bank for all customer funds and makes these funds readily available to you. This is a requirement from APRA for Wise.Under the Financial Claims Scheme, deposits are protected upto $250,000 only. Does this apply to funds held with ProSpend?
Q. Under the Financial Claims Scheme, deposits are protected upto $250,000 only. Does this apply to funds held with ProSpend?
A. ProSpend works with Wise to hold customer funds, issue cards and process transactions. Wise is an Authorised Deposit-taking Institution (ADI) with a Purchased Payments Facility (PPF), which doesn’t fall under the Financial Claims Scheme. As such, this FCS ruling does not apply to funds held with Wise. Instead, Wise is required to safeguard your deposits by holding 105% in a separate bank account, in cash. So, if you hold $100,000, wise separately hold $105,000 to safeguard your funds - which can be perceived as more secure than the FCS protection.
Q. How are FX transactions handled in ProSpend?
A. When transactions are conducted in a currency other than that which the balance sits in, this transaction is considered an FX transaction in ProSpend. FX transactions incur a per transaction FX Conversion Fee which is also deducted from the balance at time of transaction. When these FX transactions are displayed in ProSpend, the transaction amount shown is inclusive of the FX Conversion Fee amount. This allows users to have to only deal with the single transaction line, as opposed to having to deal with a line for the transaction and another one for the FX conversion fee.
Q. What Anti-Money-Laundering / Counter-Terrorism-Financing (AML/CTF) policies and procedures do ProSpend customers and their cardholders need to maintain?
A. According to AUSTRAC’s website, Regulated entities that provide particular designated services are the ones that must enrol with AUSTRAC and comply with the obligations set out in the AML/CTF Act (AUSTRAC). Businesses can check if they need to enrol on this page from AUSTRAC.
- Conducting customer due diligence (CDD)
- Conducting ongoing due diligence
- Reporting
- Developing and maintaining an AML/CTF Program
- Record keeping
- Enrolment and registration with AUSTRAC